If you got our recycled plastic cube, follow the steps
DIY
Assembly manual

Introduction
This DIY assembly manual provides a detailed step-by-step guide to help you create a beautiful paper lamp cube. It assumes you have the necessary materials and tools, including an png file with the pattern, cutting tools, and a mobile lantern as the light source.
The manual is accompanied by pictures to visually assist you in each step of the process

Materials required for a DIY paper lamp cube assembly manual
- Paper
- Cutting tools: Scissors or craft knife
- Mobile lantern: Battery-operated or USB-powered lantern
- Ruler or measuring tape
- Pencil or marker
- Optional: Decorative elements (e.g., markers, colored paper)
Step 1: Gathering Materials and Preparing the Workspace
- Gather the required materials mentioned above.
- Clear a clean and well-lit workspace to ensure easy and safe assembly.
Step 2: Tracing and Cutting the Pattern
- Open the png file of the pattern on your computer.
- Take the paper and position it in front of the screen displaying the png pattern.
- Using a pencil or marker, carefully trace the pattern onto the paper, following the lines and shapes accurately.
- Ensure all the necessary pattern pieces are traced onto the paper before proceeding to the next step.
- Carefully cut out each pattern piece along the outer edges using scissors or a craft knife.


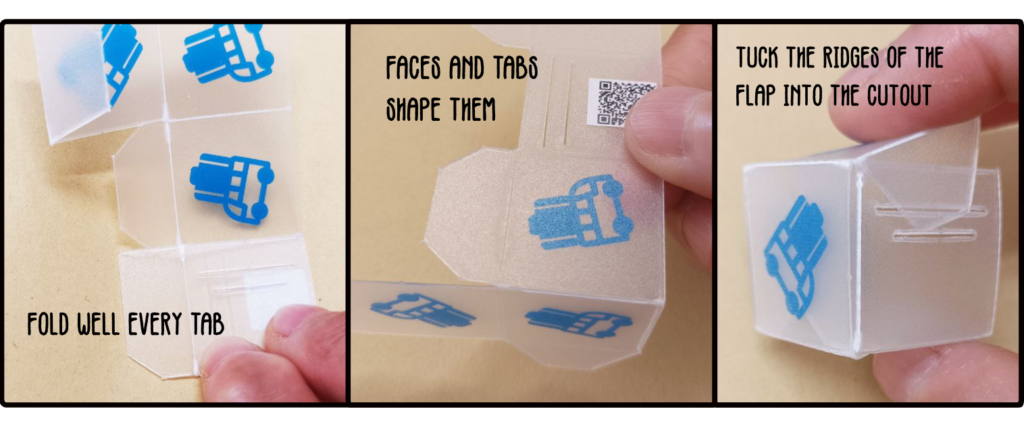
Step 3: Folding and Shaping the Paper
- Take one of the cut-out pattern pieces and fold along the indicated lines. Use a ruler or straight edge for neat, precise folds.
- Repeat this process for all the remaining pattern pieces.
- Crease the folds well to ensure they hold their shape.
step 4: Assembling the Cube
- Insert the tabs of one pattern piece into the corresponding slots of another pattern piece, forming a corner of the cube.
- Repeat this process until all sides of the cube are connected, ensuring the tabs securely fit into the slots.
- Gently push and adjust the pieces to ensure a snug and stable fit.
Step 5: Designing the Cube Faces
- Decide how you want to decorate the cube faces. You can use markers, colored paper, or any other creative elements.
- Carefully design and decorate each face of the cube.
- Allow any ink or adhesive to dry completely before proceeding.
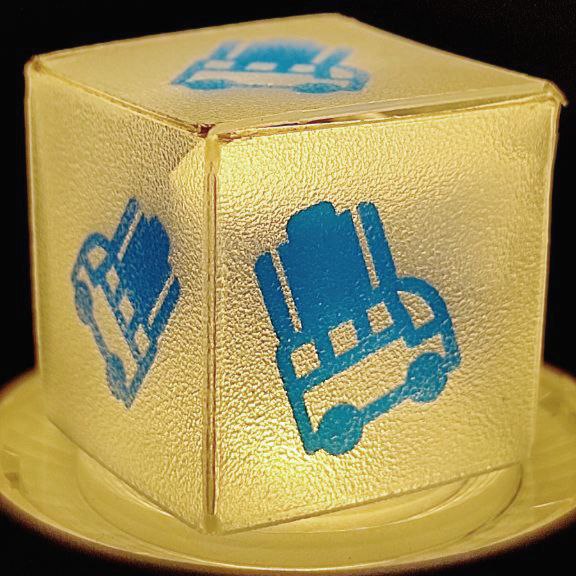
Step 6: Installing the Mobile Lantern
- Place the assembled cube over the mobile lantern.
- Ensure the lantern is centered and secure, allowing the light to illuminate the cube evenly.
- If necessary, use tape or another non-permanent method to hold the lantern in place.


Step 7: Final Touches and Safety Precautions
- Inspect the cube to ensure all edges and corners are securely connected.
- Make any necessary adjustments to ensure a stable and well-constructed cube.
- Test the lighting setup to ensure proper functionality and safety.
- Keep flammable materials away from the mobile lantern to avoid fire hazards.
Conclusion
Congratulations! DIY paper lamp cube: You have successfully assembled your own paper lamp cube using the insertion method and a mobile lantern as the light source. Afterwards enjoy the soft glow and elegant design it brings to your space. Otherwise feel free to customize your cube by exploring different decorative elements and materials.
Keywords: DIY paper lamp cube, Assembly manual, Recycled plastic cube
